検索
この検索ボックスを閉じる

Single Machine Bag Dust Collector Installation Guide

Installing a single machine bag dust collector is a systematic project. It requires careful preparation and proper operation. Here are the detailed installation steps to ensure you can efficiently and safely complete the installation.

1.準備

Before installing the single machine bag dust collector, you need to do the following:


  • Choose a Location: Select a suitable position based on the layout of the production site. Ensure it is close to the inlet and outlet pipes for easy connection.


  • Follow Installation Instructions: After determining the location, install the main unit according to the manual. This includes installing the base, main unit, and bag components.


  • Clean the Site: Ensure the installation site is clean and free of debris and obstacles to facilitate smooth installation.


  • Check Components: Inspect all parts of the dust collector to ensure they are undamaged. Replace any damaged parts promptly.


  • Prepare Tools: Gather necessary installation tools and materials, such as screwdrivers, wrenches, and lifting equipment.


2. Install the Foundation

Choose a suitable installation location and foundation structure. Ensure the foundation is stable and level to support the weight of the 集塵機 and absorb vibrations during operation.


  • Place the Base: Set the dust collector's base on the foundation and use a level to adjust it to a horizontal position.


3. Install the Ash Hopper

Place the ash hopper on top of the base. Ensure it connects tightly to the base without any wobbling.


  • Seal the Connection: Use sealing materials to seal the connection between the ash hopper and the base to prevent dust leakage.


4. Install the Filter Bag Chamber

Lift the filter bag chamber above the ash hopper. Ensure both parts are aligned.


  • Secure the Connection: Use special clamps or bolts to tightly connect the filter bag chamber to the ash hopper. Ensure the connection is sealed reliably.


5. Install the Pulse Cleaning System

Install the pulse pipes above each フィルターバッグ. Ensure the pipes are aligned with the bags.


  • Connect Air Pipes: Connect the compressed air pipeline to ensure smooth delivery of compressed air to the pulse pipes.


  • Install the System: Install the pulse valves and control system to ensure the pulse cleaning system can operate automatically as programmed.
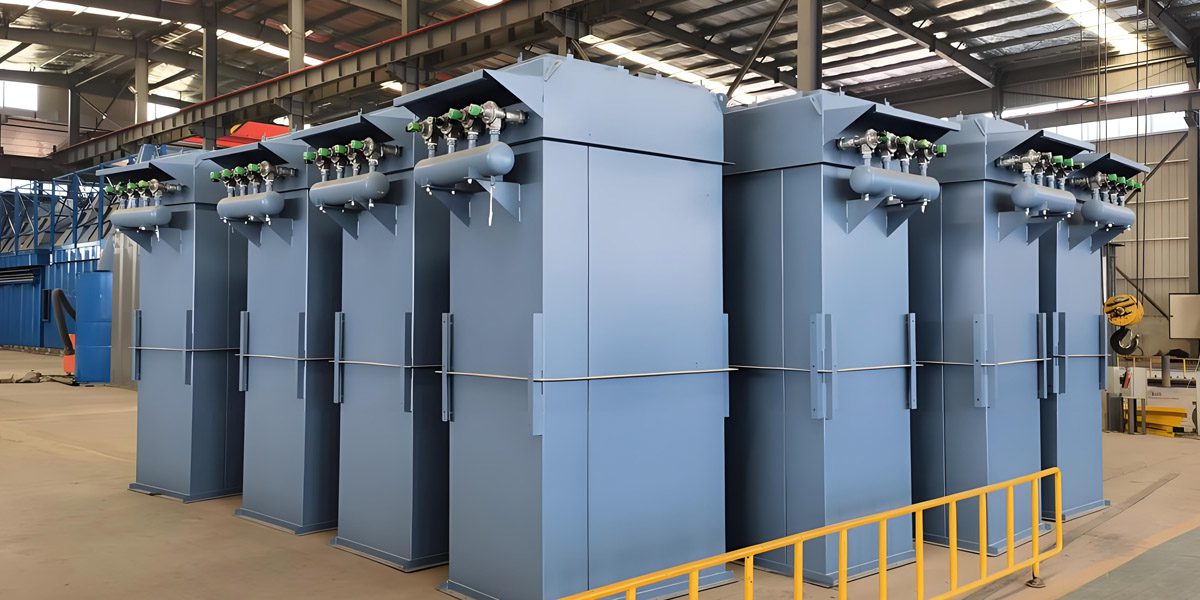
A group of stand-alone bag dust collectors are displayed in the Darko factory, reflecting advanced manufacturing technology

6. Install Inlet and Outlet

After installing the main unit, connect the inlet and outlet pipes according to the production line requirements. Ensure the connections are secure.


  • Connect Inlet Pipe: Connect the inlet pipe to the dust collector's inlet, ensuring a tight seal to prevent dust leakage.


  • Connect Outlet Pipe: Connect the outlet pipe to the dust collector's outlet, ensuring it is aligned to reduce airflow resistance.


7. Install Electrical System

Refer to the electrical diagrams to properly connect the power and control circuits of the dust collector.


  • Confirm Voltage: Before connecting the dust collector to power, confirm that the voltage matches the specifications in the manual. If there is a distribution box, connect the appropriate power lines.


  • Check Connections: Ensure that all electrical connections are secure and reliable for normal operation of the equipment.


8. Debugging and Testing

After completing all installation work, debug and test the single machine bag dust collector.


  • Function Check: Verify that all functions of the equipment are normal, such as the shaking of the filter bags and the ash discharge from the hopper.


  • Run Test: Observe the operating status and emissions of the equipment to ensure the dust removal effect meets the requirements.

9. Maintenance and Care

After installation, regularly maintain and care for the single machine bag dust collector. This includes replacing filter bags and cleaning the ash hopper.

  • Ensure Long-Term Operation: Follow the manufacturer's recommendations to use appropriate filter bags and sealing materials for stable long-term operation of the equipment.


By following these steps, users can correctly and safely complete the installation of the single machine bag dust collector. During the installation process, always pay attention to safety and detail to ensure normal operation and optimal performance of the equipment.For more information or support, please feel free to お問い合わせ.

下記フォームよりお気軽にお問い合わせください。24時間以内にご返信いたします。

* 名前:
国 :
* 電子メール:
Tel :
メッセージ :

Single Machine Bag Dust Collector Installation Guide

Installing a single machine bag dust collector is a systematic project. It requires careful preparation and proper operation. Here are the detailed installation steps to ensure you can efficiently and safely complete the installation.

1.準備

Before installing the single machine bag dust collector, you need to do the following:


  • Choose a Location: Select a suitable position based on the layout of the production site. Ensure it is close to the inlet and outlet pipes for easy connection.


  • Follow Installation Instructions: After determining the location, install the main unit according to the manual. This includes installing the base, main unit, and bag components.


  • Clean the Site: Ensure the installation site is clean and free of debris and obstacles to facilitate smooth installation.


  • Check Components: Inspect all parts of the dust collector to ensure they are undamaged. Replace any damaged parts promptly.


  • Prepare Tools: Gather necessary installation tools and materials, such as screwdrivers, wrenches, and lifting equipment.


2. Install the Foundation

Choose a suitable installation location and foundation structure. Ensure the foundation is stable and level to support the weight of the 集塵機 and absorb vibrations during operation.


  • Place the Base: Set the dust collector's base on the foundation and use a level to adjust it to a horizontal position.


3. Install the Ash Hopper

Place the ash hopper on top of the base. Ensure it connects tightly to the base without any wobbling.


  • Seal the Connection: Use sealing materials to seal the connection between the ash hopper and the base to prevent dust leakage.


4. Install the Filter Bag Chamber

Lift the filter bag chamber above the ash hopper. Ensure both parts are aligned.


  • Secure the Connection: Use special clamps or bolts to tightly connect the filter bag chamber to the ash hopper. Ensure the connection is sealed reliably.


5. Install the Pulse Cleaning System

Install the pulse pipes above each フィルターバッグ. Ensure the pipes are aligned with the bags.


  • Connect Air Pipes: Connect the compressed air pipeline to ensure smooth delivery of compressed air to the pulse pipes.


  • Install the System: Install the pulse valves and control system to ensure the pulse cleaning system can operate automatically as programmed.
A group of stand-alone bag dust collectors are displayed in the Darko factory, reflecting advanced manufacturing technology

6. Install Inlet and Outlet

After installing the main unit, connect the inlet and outlet pipes according to the production line requirements. Ensure the connections are secure.


  • Connect Inlet Pipe: Connect the inlet pipe to the dust collector's inlet, ensuring a tight seal to prevent dust leakage.


  • Connect Outlet Pipe: Connect the outlet pipe to the dust collector's outlet, ensuring it is aligned to reduce airflow resistance.


7. Install Electrical System

Refer to the electrical diagrams to properly connect the power and control circuits of the dust collector.


  • Confirm Voltage: Before connecting the dust collector to power, confirm that the voltage matches the specifications in the manual. If there is a distribution box, connect the appropriate power lines.


  • Check Connections: Ensure that all electrical connections are secure and reliable for normal operation of the equipment.


8. Debugging and Testing

After completing all installation work, debug and test the single machine bag dust collector.


  • Function Check: Verify that all functions of the equipment are normal, such as the shaking of the filter bags and the ash discharge from the hopper.


  • Run Test: Observe the operating status and emissions of the equipment to ensure the dust removal effect meets the requirements.

9. Maintenance and Care

After installation, regularly maintain and care for the single machine bag dust collector. This includes replacing filter bags and cleaning the ash hopper.

  • Ensure Long-Term Operation: Follow the manufacturer's recommendations to use appropriate filter bags and sealing materials for stable long-term operation of the equipment.


By following these steps, users can correctly and safely complete the installation of the single machine bag dust collector. During the installation process, always pay attention to safety and detail to ensure normal operation and optimal performance of the equipment.For more information or support, please feel free to お問い合わせ.

シェアする

その他の投稿

Design of explosion-proof pressure relief device

Dust Collector Explosion-Proof Design

Dust explosions occur when dust particles suspended in the air come into contact with oxygen and undergo a rapid oxidation reaction under specific conditions. This

メッセージを送る

jaJA